 0 |
0 | SALE - 10% OFF ALL STAIRCASES USING OUR ONLINE STAIRBUILDER SOFTWARE - DISCOUNT APPLIED AT CHECKOUT
Help & Guides
Newel Post Installation
Below is a guide of how to fit a timber newel post to your new staircase.
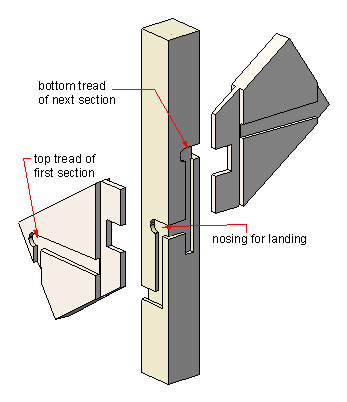
Please note all our newel posts are dry fitted and pre-drilled in our workshop as we build every staircase and all risers have been pre-fitted and labelled.
First
Any newel posts that run to the floor that the staircase bottom tread sits on, you will find we have marked a floor line cut all around the newel post. Prior to cutting, you must check that your floor is level or slight allowances will have to be made accordingly.
Second
All our posts have been dry fitted and pre-drilled to take the dowel rod supplied. If you follow our CAD drawing which is supplied with your order and our delivery paperwork, you will see that all newel posts and Tenon’s on the strings are numbered. Once you are happy everything is in the correct place, then move onto the next stage. Using plenty of glue, slide the newel post into place and using screws the dowel we provide fix the newel post tight to the Tenon shoulder, (please note we Tenon our strings in the centre to create a double shoulder which enables this process to be a little easier), then make sure your newel post is square to the tread.
Third
Before you begin to fix any of the staircase risers, all additional winder treads and bottom shaped treads, if ordered, i.e. bullnose tread or curtail treads must be fitted. Once these are fitted then proceed to fit all the risers. As before you will find these are numbered as they have been dry-fitted. Use copious amounts of glue and fit all wedges and glue blocks supplied. Please wait a period of 24 hours for all the glue to fully dry and cure before walking on the staircase. This will stop any squeaks in the future.